VueScan - 'Color' Tab
© Thomas GadeIndex

The Color tab contains the settings for color reproduction, brightness, and contrast. It also allows you to select the type of film being scanned. VueScan includes profiles for all supported film types. In practice, however, these profiles are often of limited value because they were most likely created from fresh film scanned under standardized conditions, probably using a color target photographed in daylight.
The profiles also compensate for the brown or orange mask found on color negative films. However, even films of the same type may differ if the chemical development process was not carried out exactly according to specification. Therefore, it is often worth trying different film profiles, even if they do not match the film actually being scanned. In many cases, the Generic profile already produces excellent results.
Color Balance
This setting determines the method used for color correction. The default setting, White Balance, is suitable for most images. Neutral is useful when the original lighting should be preserved, for example the warm reddish tones of a sunset.
The remaining options are of little practical importance for most scanning tasks.
| Manual |
| Neutral |
| Incandescent Lamp |
| Fluorescent Lamp |
| Night |
| Auto Levels * |
| Landscape ** |
| Portrait *** |
| None **** |
* The darkest value in each color channel is mapped to 0.00, and the brightest value is mapped to 0.95.
** Optimizes sky blues and foliage greens.
*** Optimizes the reproduction of natural skin tones.
**** No black or white point adjustment is performed. The image is corrected only by using the CCD sensor's color response (when Media is set to Image) or the film's color response. The image is then gamma corrected.
Black Point
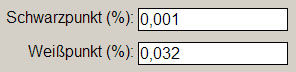
For virtually all images, the Black Point should be changed from 0 to 0.001. This setting determines what percentage of the darkest pixels will be rendered as pure black. Increasing the value converts more very dark gray tones to pure black, increasing image contrast but also reducing shadow detail.
White Point
The default White Point is 1%, meaning that the brightest one percent of all pixels are mapped to pure white. Increasing this value converts more light gray tones to pure white. This can make an image appear brighter and more brilliant, but it also sacrifices detail in the brightest areas—for example, fine structures in bright clouds may disappear, leaving featureless white regions.
Note: Under Prefs | Graph Type, it is useful to select B/W. The abbreviation stands for Black & White. Moving the triangular sliders beneath the histogram changes the values shown in the Black Point and White Point fields. Anyone who understands how to use this histogram can set both values very precisely.
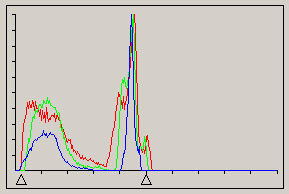
Example: Setting the White Point
Pay attention to both the value displayed next to White Point and the position of the right-hand triangle beneath the histogram, which controls the White Point.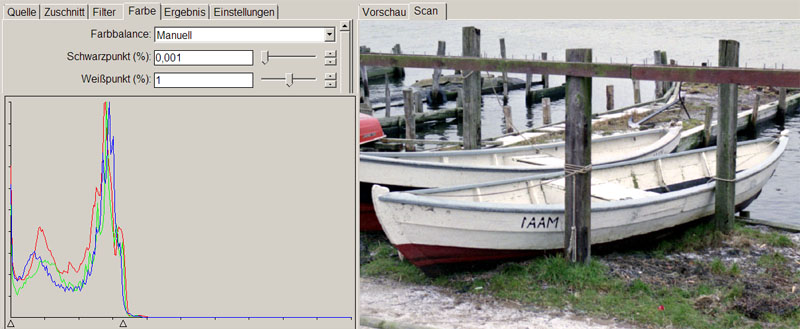
The default value is 1.0. The White Point slider is positioned relatively far to the left. As a result, the bright bench in the center of the boat contains almost no tonal detail and appears overexposed.

Here the White Point is set to 0.2. The slider has been moved further to the right, allowing very bright gray tones to be reproduced with greater differentiation. However, the bench in the center of the boat is still too bright and highlight detail is lost. The histogram still shows tonal values to the right of the White Point. These remaining values are not always important—for example, they may represent scratches on a slide or insignificant detail in extremely bright clouds, while retaining them may leave the darker areas of the image flat and lacking contrast.
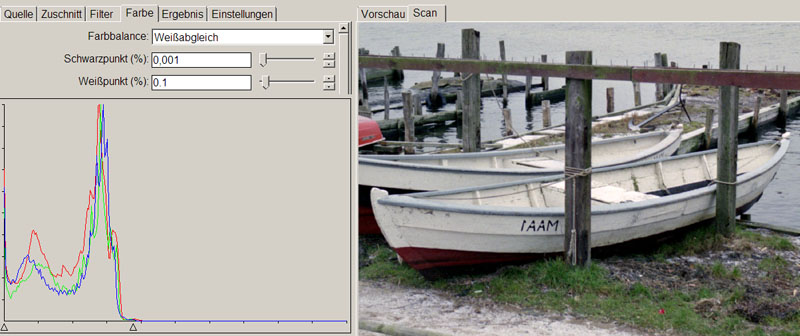
Here the White Point is set to 0.1. The slider has been moved further to the right, preserving more highlight detail than with the default setting.
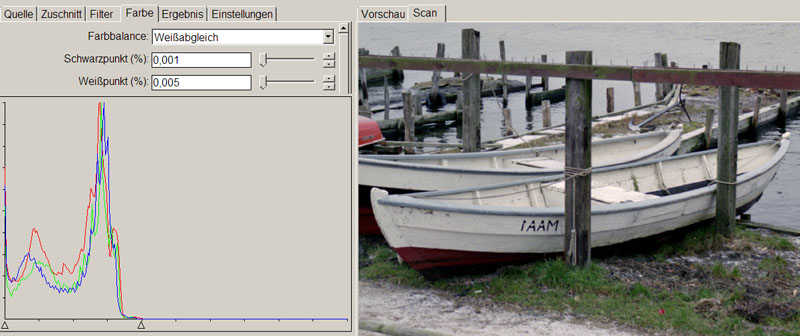
With the White Point set to 0.005, the slider is positioned almost exactly at the point where the histogram begins on the right-hand side. To find this position, move the White Point slider (the small triangle) from right to left until it reaches the beginning of the tonal distribution. The numerical value next to the White Point changes automatically while the slider is moved.
With this setting, the bright surface of the bench is reproduced with clearly visible tonal detail.
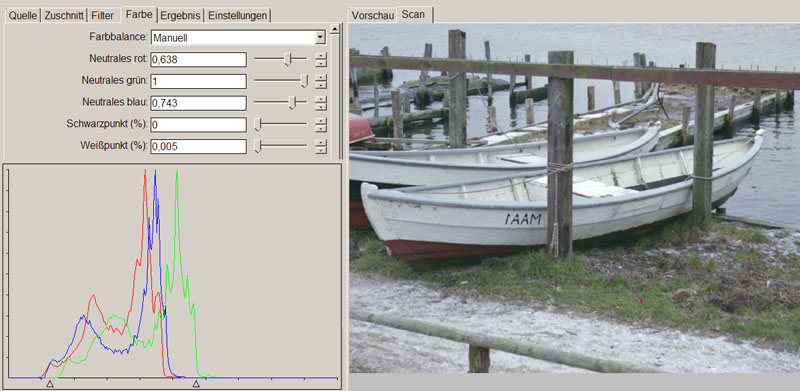
Under Color, set Negative Vendor to KODAK and Negative Brand to Internegative. On the Filter tab, disable Restore Fading. The colors can then be adjusted manually. This method provides extensive control over tonal values and color reproduction, although it is rarely suitable for batch scanning.
A better approach is usually to move the White Point slider from right to left until it is positioned just before the end of the histogram.
Threshold
This option sets the threshold between pure black and pure white. It is available only when scanning with 1 bit per sample, where each pixel is represented as either black or white.
Curve Low / High
Image contrast can be adjusted with two sliders. Lowering the Low value darkens the shadow areas, while increasing it brightens them. Raising the High value makes the highlights brighter, whereas lowering it reduces highlight brightness.
Default settings:
To display the tone curve, set Prefs | Graph Type to Curve. The curve can be adjusted using the two triangular sliders beneath the graph, which change the corresponding numerical values.
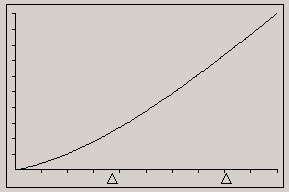
Double-clicking the graph restores the default settings.
Brightness
Brightness adjustment.
Brightness Red / Green / Blue
These controls allow the brightness of the red, green, and blue channels to be adjusted independently.
Negative Vendor / Brand / Type
In many cases it is possible to identify the exact film that is being scanned. In theory, a dedicated profile can be created for every film type to reproduce its individual color characteristics and tonal response. VueScan therefore allows you to select a specific film from its database.
When identifying 35 mm films, the Film List provides detailed information about the markings printed along the film edge next to the perforations.
In practice, however, this feature is often of limited usefulness. Trying several different profiles usually shows that selecting the profile that actually matches the scanned film does not necessarily produce the best results. In most cases, the Generic profile delivers the most pleasing colors.
When scanning black-and-white film, I always select Kodak / Internegative and perform all tonal adjustments using the Black Point, White Point, and Curve controls. The other film profiles generally produce some loss of shadow detail.
It should also be remembered that scanned images are normally edited afterwards. Saving the scan with 16 bits per channel and using moderate Black Point and White Point values leaves plenty of room for accurate color correction during post-processing. Adobe Photoshop and other image-editing applications, together with tools such as Kodak ROC Pro, are particularly valuable for this purpose.
```html id="b7x3q2" Color Space
Scanner, Printer,
Film, Output, Monitor
(Professional Edition only)
This section defines the color space used. The default settings are appropriate for most users. For Output Color Space, selecting Adobe RGB instead of sRGB can be a useful alternative when a wider color space is desired.
For Film Color Space, ICC Profile can be selected instead of Built-in. When ICC Profile is chosen, the following options become available.
ICC Profile
for Scanner, Printer,
Film, File, Monitor
Select the appropriate ICC profile.
ICC Description Scanner, Printer, Film
This field displays or allows entry of information describing the ICC profile currently in use.
IT8 Data
Scanner, Printer, Film
This option is relevant if you have calibrated your scanner.
Every IT8 or Q60 target has an associated reference file containing the measured color values for each patch on the target. This file is used when creating a profile for a scanner, printer, or film using an IT8 target (Profile | Create Scanner Profile).
If this reference file does not exist, VueScan uses the theoretical IT8 target colors instead. This is not recommended because the accuracy of the resulting profile is reduced. This setting is available when Color | Color Space is set to ICC Profile.
Show IT8 Outline
This option displays a grid over the preview image showing the positions of the IT8 target patches. The grid includes the grayscale strip at the bottom of the target and the first 19 columns of color patches.
Pixel Colors
This function displays clipped black and white tones, colors outside the reproducible color space (out of gamut), and the results of infrared defect detection.
When Pixel Colors is enabled, the following options become available:
Black Clipping Color
This option highlights pixels in the preview and scan windows where at least one color channel is at pure black. A few isolated pixels are usually not a problem because the subject itself may contain such areas. However, if larger areas are highlighted, they contain pure black without any tonal detail or texture.
White Clipping Color
This option highlights pixels in the preview and scan windows where at least one color channel is at pure white. A few isolated pixels are usually not a problem because the subject itself may contain such areas. However, if larger areas are highlighted, they contain pure white without any tonal detail or texture.
Out of Gamut Color
Pixels containing at least one color component outside the reproducible color space are highlighted in the preview and scan windows. This option is available when Color | Pixel Colors is enabled. These highlights are not stored in the image files.
Infrared Defect Color
This option displays image defects detected by the infrared channel that can be removed using Filter | Infrared Clean. These colored pixels are not saved in the output files but are displayed in the preview and scan windows. A scanner with an infrared channel is required, or a 64-bit raw file created by such a scanner must be used.
Table of Contents:
General
IntroductionCalibration
Scanning black-and-white film
Scanning color negatives
Scanning slides
Identifying film types
Tabs
SourceCrop
Filter
Color
Output
Settings